Table of Contents
Do you want to create a professional-looking travel blog all by yourself?
Would you love to be completely independent from web design companies and avoid spending a fortune on a website or blog?
Good news—I’ll teach you exactly how to do it! Yes, I will!
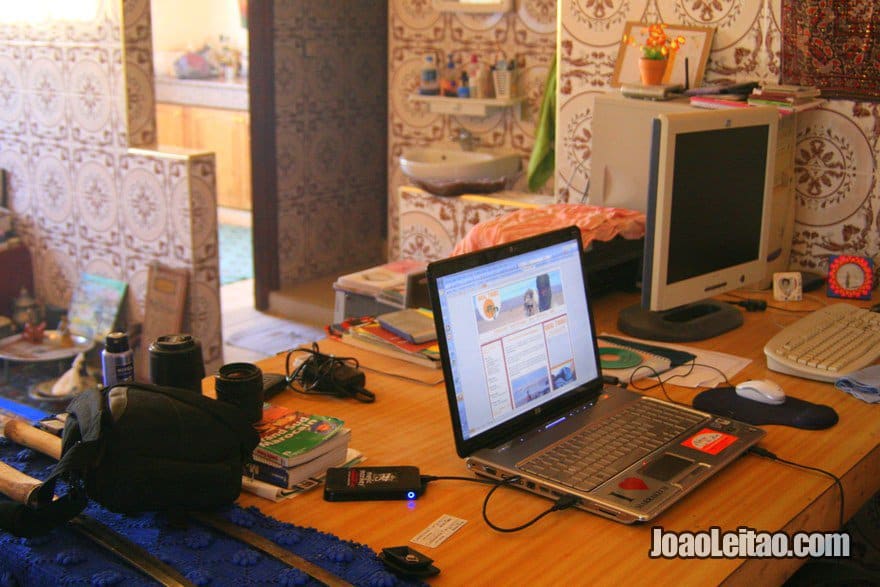
With my step-by-step tutorial you will have your website running in less than 1 hour.
Almost every day, I get emails from people asking me:
“how do I create a travel blog?“,
“how much does a website cost?“;
or
“how do I create a site for little money?“.
Through the Internet we can publish and share travel information, photos, our travel stories or even our poetry online. Sometimes I get the idea that people feel that owning a site / blog is either hard or too expensive.
But it is not!
Well, everything in life takes time. Having your own travel blog is very easy, but it does take a little while setting it up.
And then, you will need to update it from time to time.
You see, a blog / site is like a little child: it requires work, care and time.
You can start a Travel Blog to:
- Publishing your work.
- Making money online.
- Sharing information.
Let’s do this then! I will teach you how to create a website / travel blog step by step.
I will guide you and show how easy it is to create your very own professional-looking site in very simple steps.
You can always start a free blog on Medium, like my friend Matthew did with his travel blog. However, I’ll share how to take it a step further by creating a more advanced and professional setup.
To start a travel blog you need:

- To own your domain (either .com or .net).
- To have your site hosting space.
- To connect your domain with your host.
- To install a content management system.
- To choose and install your favorite theme.
- To customize your site.
- To start writing and publishing content online.
Easy!
Take the first step and start your own site today!

I know that creating sites is really easy.
I have been creating them for the past 12 years.
In fact, that is how I ended up working in Morocco. I had my own web-agency and online marketing company and made more than 200 websites alone.
Stop wasting time, then.
Nothing is that hard, least of all creating your own site.
All you need is some patience, a free afternoon and the very simple steps I will teach you on this page.
You have nothing to be afraid of—owning your site means independence and freedom. And saving money too, since you won’t have to pay other people to do what you can do by yourself.
Give yourself 1 hour, focus, read this tutorial.
What other travel bloggers are saying
I personally wrote to some travel bloggers asking them about their thoughts on owning a website and how that influences their lives.
OneStep4Ward
“Blogging literally changed my life. Before my blog I didn’t realize life could be so free, now I’ve worked out how to make money online, and I’m on my way to visiting every country in the world. I love to help inspire other people now, and hopefully they can see that if I did it, so can they.”
Johnny Ward from OneStep4Ward.
Expert Vagabond

“Blogging allows me to share amazing travel experiences & photography with a large audience, inspiring other people while also earning a living doing what I love. Making money doing what you love — that’s living the dream.”
Matthew Karsten from Expert Vagabond.
GoNomad
“Travel blogging gives you an instant credibility, and after 10 years you have 4000 posts and so people can see by your vast archives that you take blogging seriously and you do it every day.”
Max Hartshorne from GoNOMAD.
Time Travel Turtle

“I used to work as a radio and television journalist but always had dreams to see more of the world. As digital media increased in power, I saw great opportunities to use blogging to continue my journalism – but on my own terms. I never really saw my blog as a diary, but more as a collection of my travel writing. I wanted to share the world with my readers and hope to keep doing that for many years to come. I make an income through two main avenues – by utilizing the influence my blog has and by using the skills that I have as a blogger. I work with brands and destinations on content generation and online marketing campaigns. The thing I love most about this lifestyle is the freedom and the flexibility. Although I work really hard sometimes, I am not locked into any particular job or any particular location. I can shape each day the way I want.”
Michael Turtle from Time Travel Turtle.
Travels of Adam

“Blogging, for me, is all about the connections. Who I meet, where, and what we do together. I started the blog to meet other people interested in travel and that’s what I’m doing today, so for me, that’s success.”
Adam Groffman from Travels of Adam.
Legal Nomads

“Blogging has provided me with a platform to connect with like-minded people around the world through my words, meeting many of them in person. I would be writing even if no one would read — I love to write! But it has been wonderful to share experiences in ways others find compelling, and to then have that become my work.”
Jodi Ettenberg from Legal Nomads.
The Blonde Abroad

“Blogging, for me, started out as my passion. I enjoyed the story-telling aspect of travel, and being able to have a place for photos and my adventures off the screen of my digital camera and outside the frames within my bedrooms. That passion has evolved into my business which I am so grateful for. As someone that came from a career in Finance, I left behind my pessimism and gained an entirely new perspective on life once I pursued my career as a travel influencer. My blog is based on my brand, The Blonde Abroad, which is now a multi-faceted content creation & consulting company with “me” sort of playing the role as the face of the company. It’s been a crazy journey full of ups and downs and I’ve never worked harder in my life, but I’m living a life I never dreamed possible and getting to inspire others to also live a life they love.”
Kiersten Rich from The Blonde Abroad.
Journey Wonders

“Blogging provided the means of express myself and inspire countless people around the world by showing them how they can also achieve their own dreams no matter how crazy and awesome they might be. I think that doing your passion is great. Especially if you get paid for it since brands all over the world recognise and acknowledge the great value you’re creating for them.”
Raphael Alexander Zoren from Journey Wonders.
Where in the world is Rita

“I have always loved to read other blogger’s travel experiences and advises, written in the first person. I then realized that some people were interested in my own travels and stories from the road – that’s when I started blogging, also driven by my love for writing. I hope to inspire many others to travel the world and share their stories too.”
Rita Andrade from Where in the World is Rita?.
Wanderers but not lost
“We have been travel bloggers for almost ten years. First we wrote in our Portuguese blog and we were very happy with our Portuguese and Brazilian followers. It was an amazing experience sharing our travel stories with strangers and being able to contact with people from different parts of the world using. The strangers became friends and we became addicted to blogging. But, as time went by, the Portuguese language was not enough anymore. We decided to blog in English to be able to share tips, experiences and amazing travels with others friends. So we began to blog as we are wandering some place but definitely not lost.”
Carla Mota from Wanderers but not Lost.
Triphackr

“Blogging has provided me the location independence I desired during the years I spent behind a desk. I have been able to realize my dream of traveling the world and making a living doing it. Triphackr grew from a hobby to my full-time job and it has given me the freedom to travel the world to the fullest capacity.”
Clint Johnston from Triphackr.
Are you inspired enough?Let’s now go to my “How to make a travel blog” tutorial!
How to start a Travel Blog
Steps 1 and 2 – Owning your site domain (.com or .net) and hosting space
These two steps are done at the same time—in order to create your webpage, you will need to buy a hosting space which will include your free domain name every year. Just follow these simple instructions below and see how simple it all is.
[message_box type=”attention”]To buy your domain and hosting space, go to Bluehost.com and create an account. You can try Bluehost OPTIMIZED HOSTING for WordPress or a VPS plan.[/message_box]
To create an account, click on the button get started now and select your preferred plan (the starter is more than enough) and then fill in the sign up now page.
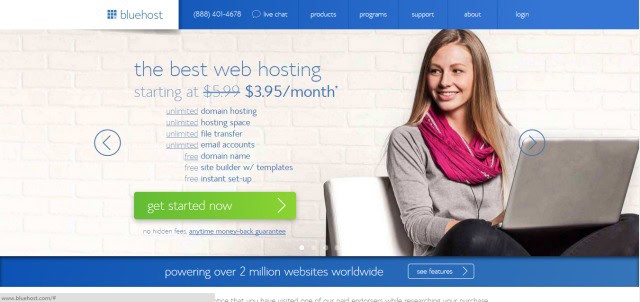
You will now choose the name of the domain attached to the account you are creating.
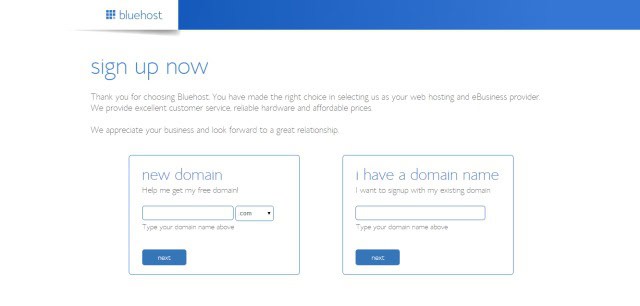
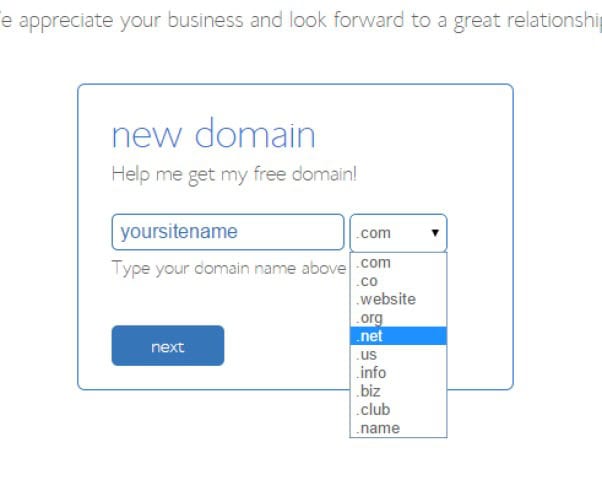
Let’s see how to pick your domain name in the following pictures. You can choose from many different domains, but I find that I prefer .com or .net. If you are uncertain of which name to write, your own first and last names are always good alternatives, like: www.firstlastnames.com. Remember that you can always buy another domain / site name later.
You will now be redirected to the account, package and billing information page.
First, fill out all your personal information.
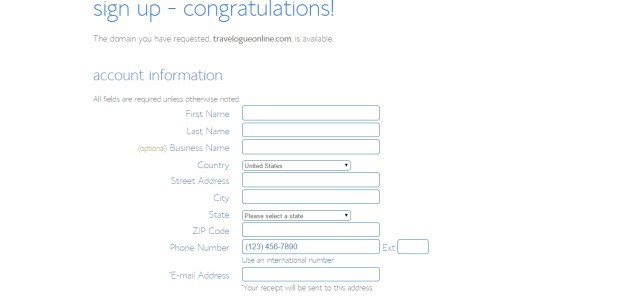
Is it safe to give all your personal information out like this? Yes, it is. I have bought over 200 sites since 2003 and I have never had a single problem to the day.
Then, select your price package. This is where you can see how inexpensive it really is to create your own site. Just take a look at these prices:
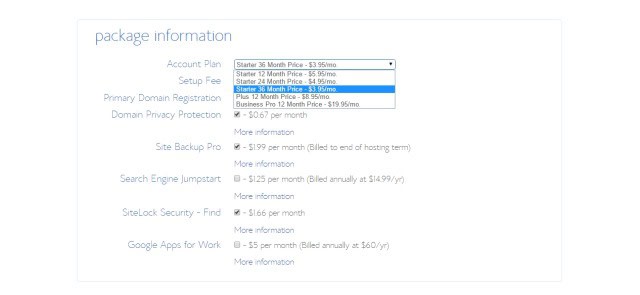
Now, my advice is that you buy the 36 month price plan. That way you will only pay once every three years and the price of your site goes down even further. $3.95 is the price you will pay per month for this price plan, which comes to $142.20 in full. $142.20 for three whole years, $3.95 per month. How cheap is that? And the best part is that you are totally on your own, not giving your money to pricey companies.
[message_box type=”error”]NOTE: Uncheck all the other services offered with your 36 month price plan, so you won’t have to pay for things you don’t really need. Uncheck Domain Privacy Protection, Site Backup Pro and SiteLock Security – Find.[/message_box]
Finally, we have the billing information. It’s time to pay for your site now.
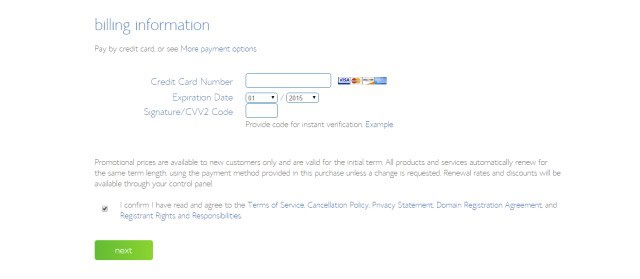
Just fill your information in. You can either pay with PayPal or a credit card. I used PayPal at first, but I only pay with my credit card these days.
And there you have it! Your very own site bought and paid for, ready to be published online. On the next pages, I will show you how to do so much more.
Create your domain and hosting space account. Start writing and publishing on your site today.
[message_box type=”attention”]Create an account and get started with Bluehost.[/message_box]

If you have any doubts, return to this page and reread all the steps.
What is a site / blog? – Short definition
Owning a site is the same as owning a blog. The kind of site / blog I will teach to create here is a webpage done differently from other regular webpages, since it allows for the nearly automatic attaching to search engines, such as GOOGLE or BING.
A blog is just a webpage, please remember that. There are some people that talk about blogs as something other than pages, when, in fact, that is exactly what they are. A weblog or blog is a webpage or site, whose updates—posts or pages—are published in inverted chronological order (from most recent to oldest). Now, these posts may or may not reflect the same type of writing, be on the same topics or even be written by the very same person. But this is all off-topic and not important right now. You will learn how to create your site in a very easy way, I promise you. Just read the next pages, follow the steps along with me, and we will have your blog / site up and running in no time. Ready? Go!
Step 3 – Installing your website
Now that you have your very own Bluehost account, go to your ‘Control Panel’ and install the domain you have already bought. In the following image, you can see your cpanel (don’t forget to login to your Bluehost account to get to your cpanel).
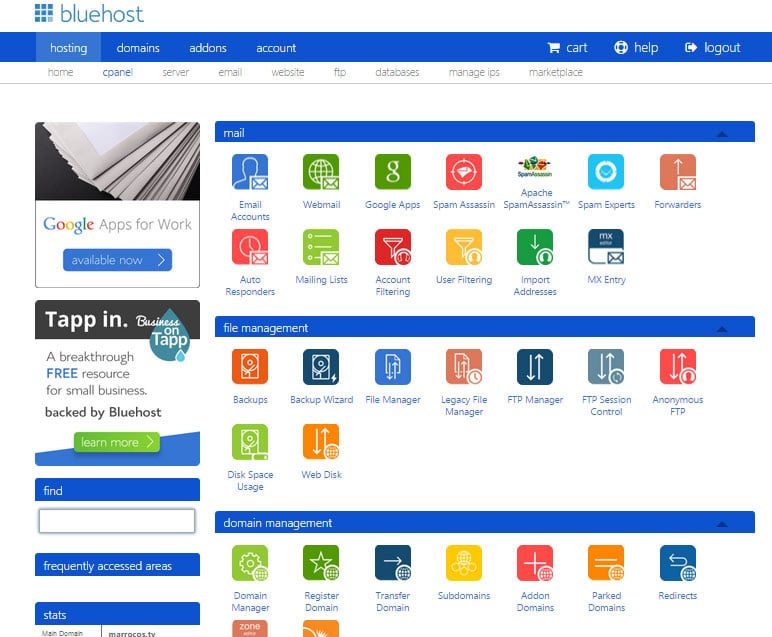
Now, on your cpanel page, look for the section on DOMAINS.
Then, select the option ADDON DOMAINS.
After clicking the Addon Domains button, you will go to the ASSIGN DOMAIN page, in which you will activate your domain.
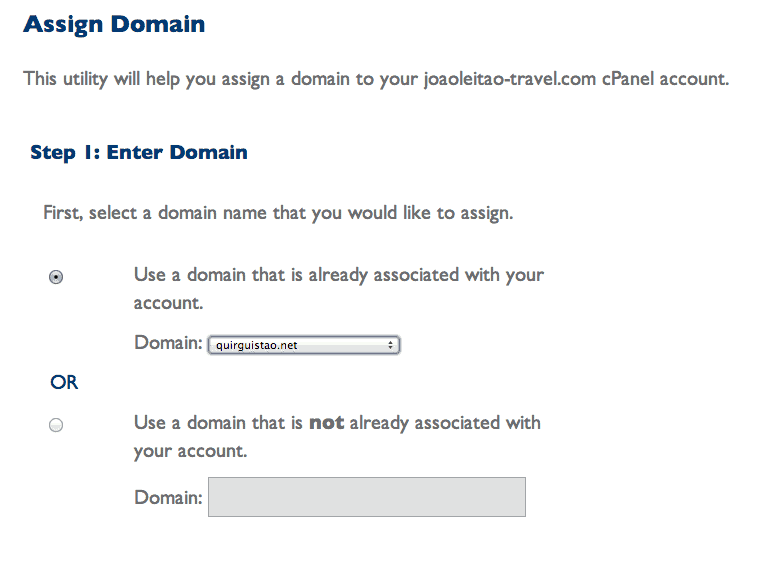
In STEP 1, select the domain you wish to activate (remember, you can own several domains attached to your account).
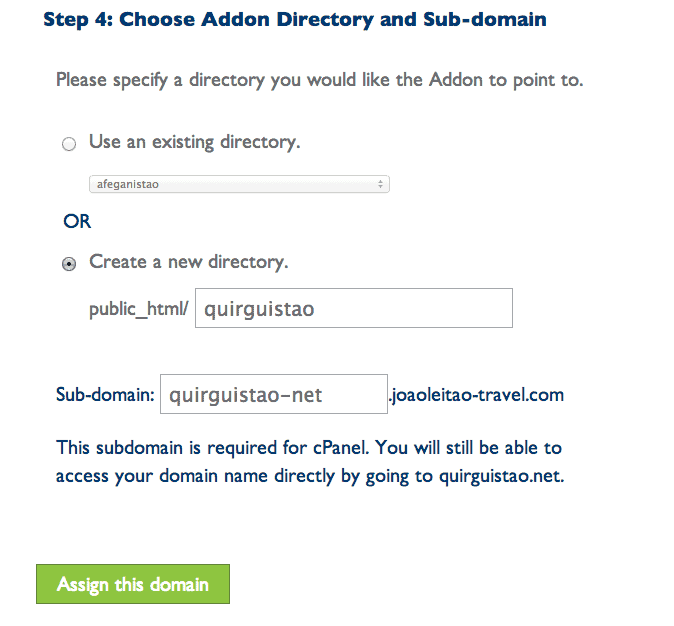
Further down the page, you will have to check the option CREATE A NEW DIRECTORY. Then, click on the green ASSIGN THIS DOMAIN button. And that’s it! You will be redirected to the cpanel main page again.
Step 4 – Installing a content management system
So, now it’s time to set up the ‘software’ that will run your site, i.e., the system that will allow you to manage pages, categories, posts—it’s time to install the heart of your site, the thing that makes it tick.
A Content Management System (CMS) is actually very simple to install. When you are done with this step, you will have a login and password to enter your site dashboard. See how simple it is:
Select the WORDPRESS button:

You will now see a MY INSTALLS page, listing your current WordPress installs up to date.
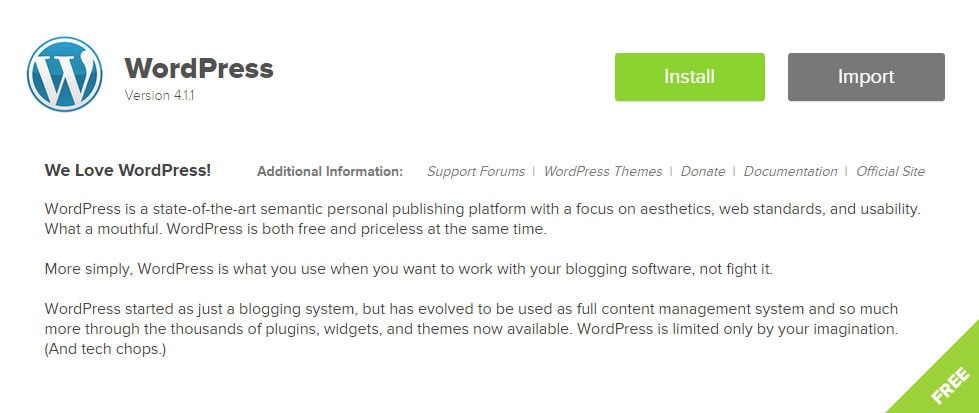
Select the regular WordPress package (and not the Premium one, it is not free of charge).
Look for the INSTALL WORDPRESS section and click on the green INSTALL button.
You have finally arrived to the final installation menu. Read every instruction carefully and do not forget to uncheck all the other services they offer.

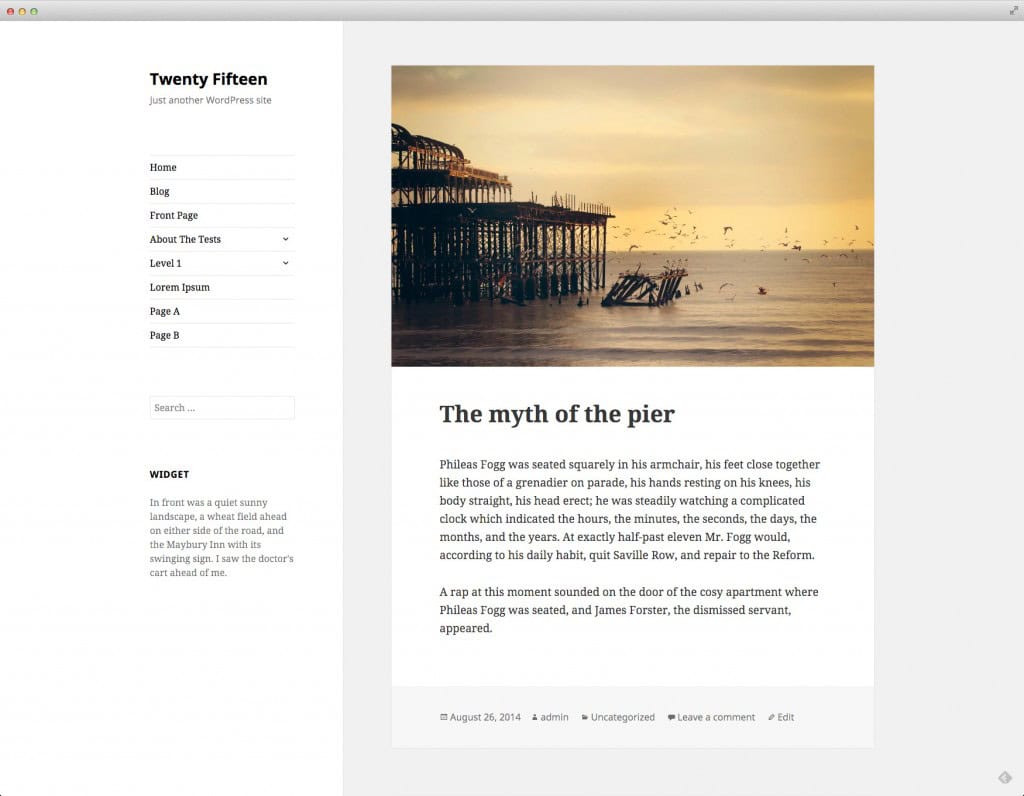
And there you have it—you now have a site with a basic theme (design) installed:
Step 5 – Choosing and setting up your selected Theme
Now that your site is fully functional, let’s put your personal touch on it. Installing WordPress has left you with a custom theme, selected by Bluehost. But we are going to find a Theme that fits you to a T and make your site just absolutely gorgeous.
Let’s go to the Ink Themes site and look for one that you love. I am also very fond of Elegant Themes – I have a subscription to this site, thus getting all of their products for a much lower price.
How much does a theme cost, you ask. Well, it really doesn’t cost all that much because you only pay for it once. A theme can go up to $59, but if you buy all the themes available on site—for only $147–, you can download the entire bundle to your hard drive and then take your time in choosing a design. That is exactly how I did it.
Here are some of WordPress themes I really love and find to be the best for a travelogue and/or photography site.
Take a look:
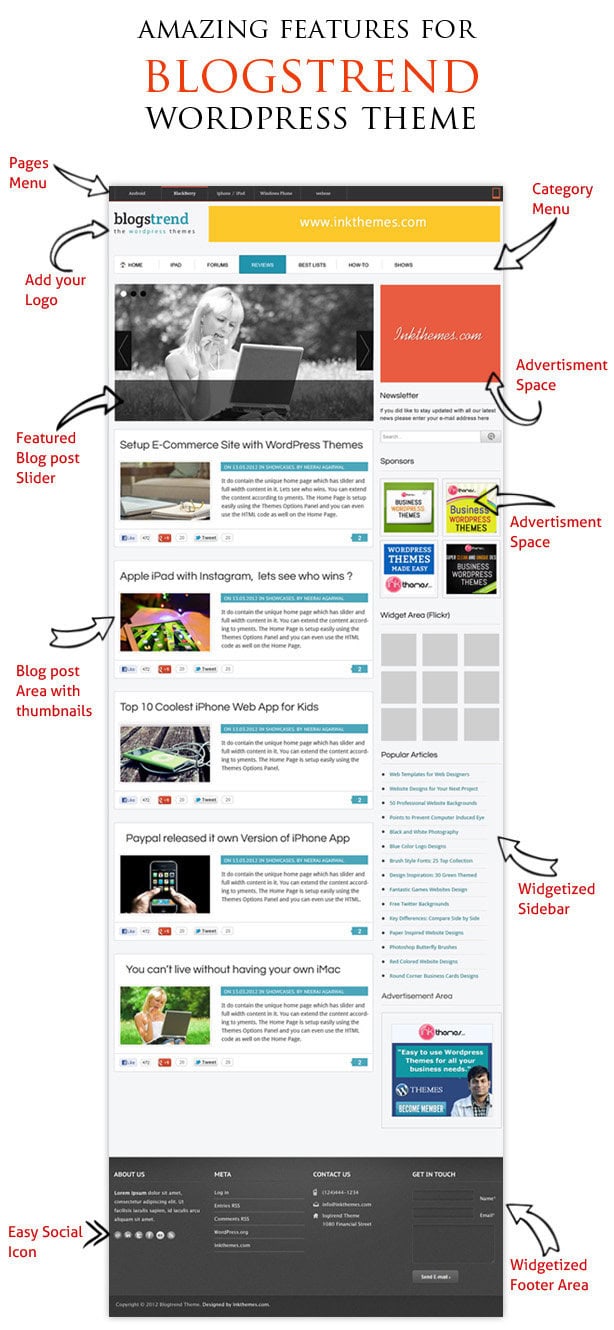
Theme 1 – Blog Trend WordPress Theme – $59
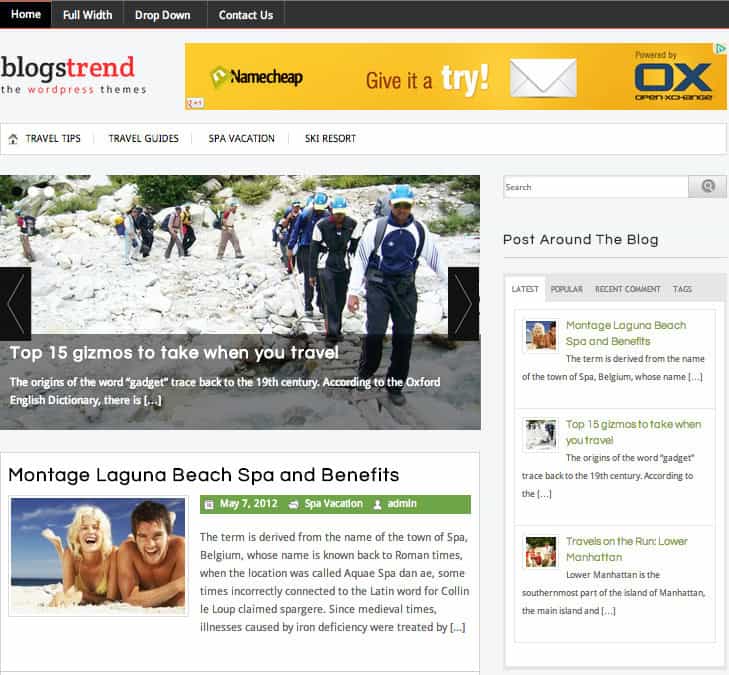
This really is my favorite WordPress theme! It has a lot of features to help you set up an easy-to-navigate site.
After this theme is properly installed, you can change the fonts, colors, images, and so much more. You can also add various referral ads to your site and get some income from it.
Theme 2 – Real Photography WordPress Theme – $59
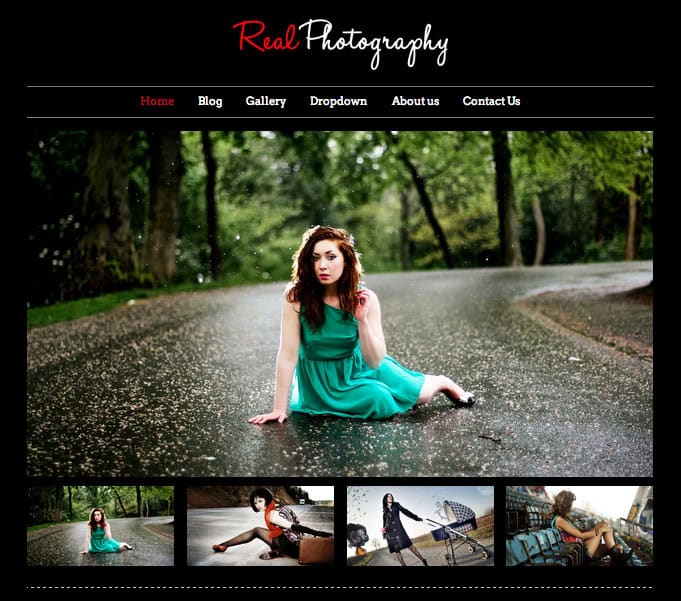
This theme is perfect for travelers that enjoy photography, or for photographers that wish to have their own professional-looking site to showcase their work for very little money. This theme gives a wide choice in colors (and custom colors too), logo, images, various photo galleries and slideshows, and much more.
Yes, you do have to pay for these two themes, but once you do, they are yours—you get an email with a link from the respective companies and you then download the themes to your computer.
Next step is installing your paid for theme in your WordPress site. That is exactly why I’d rather pay for the full bundle of themes—I download all the different themes available in a site for a much lower cost, and I can then take my time in selecting the one I want for my site. Changing a theme in WordPress only takes a click—as simple as that!
Find many more WordPress Themes at Ink Themes:
Find many more WordPress Themes at Elegant Themes:

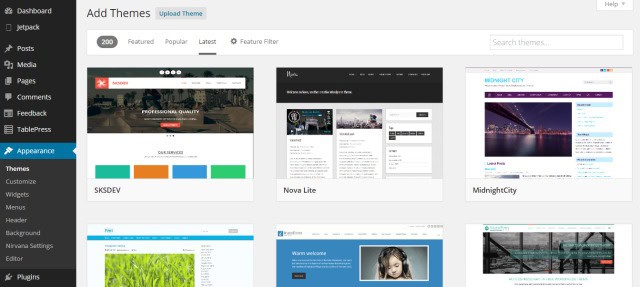
Let me show you how easy it is to install a new theme:
Login to your Dashboard (type in www.yoursitename.com/wp-admin) > on your left menu sidebar, select
Appearance, and click on Themes > look for the Add New Theme button and click on it > on the top of the page, click on Upload Theme.

Now select the .zip file provided by Ink Themes and WordPress will automatically install your theme. To finish setting it up, select Activate Theme and you are done!
You can also install the free-of-charge themes that WordPress offers you. They may not be as professional-looking or even as beautiful as the ones you pay for, but they do the job as well. Just got to your left menu sidebar, select Appearance > click on Themes > look for the Add New Theme button and click on it > choose your preferred theme > click on the Install button.
Step 6 – Customizing your site
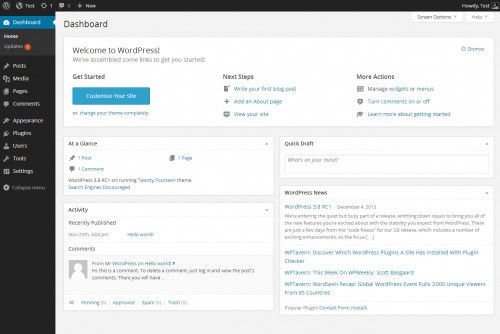
Customizing your site right from the beginning is essential. WordPress has four large customizing features: posts, pages, categories and tags.
What to know – In short:
Pages – This is the part of the site that is static. Pages such as about me, biography, portfolio, travels, contact and so on, cannot be labelled under categories or tags.
Posts – These are the pages you can organize by date, category or tag. Posts are ‘dynamic’ pages on which you can add content to your site.
Categories – You label your posts under a category, so each post you write is assigned to a specific category by you.
For instance, a post titled ‘Airport Taxi Ride To Central Park’ can be assigned to a Transportation category, or a USA > New York category. Or even perhaps a USA > New York > Transportation category. You can have a hierarchy of mother categories and under their respective children categories. So, when people come to your site and click on the New York category, all the posts assigned to it will be displayed.
Tags – Tags are another way to go when organizing your posts. You should only have so many categories for your posts, so as not to become too confusing or unkempt. But you can create as many tags as you want and they will also redirect your visitors to the posts you want to display.
For example, on the previous ‘Airport Taxi Ride To Central Park’ post, you can create the ‘taxi’, ‘airport’, ‘new york’, ‘central park’ tags, and they will all lead your visitors to that particular post, as well as other posts tagged under these expressions.
Time to organize to your site, then. Shall we?
Let’s imagine that you are starting a travelogue site. Let’s create some categories for you now:
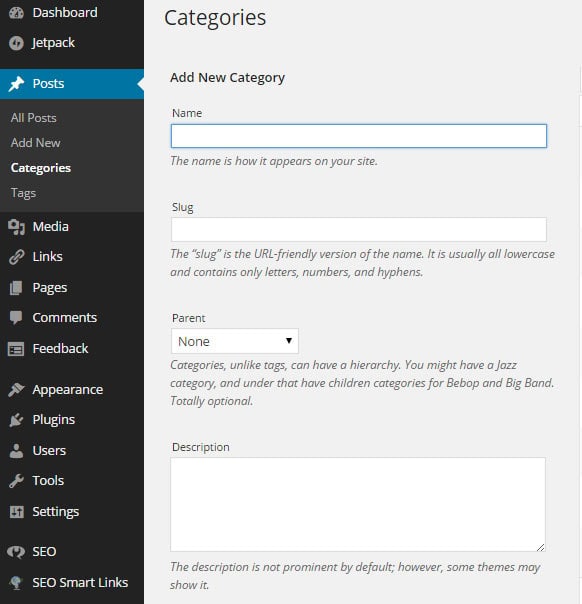
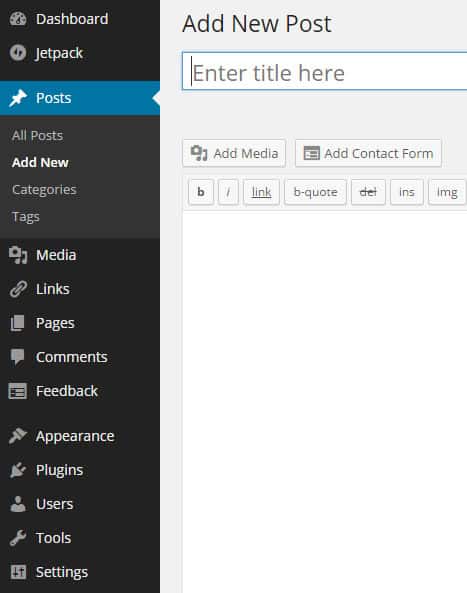
- Go to left sidebar menu > Posts > Categories.
- Now, try and create the following category hierarchies: USA > New York; USA > San Francisco; and UK > London.
Easy, right? Well done!
Step 7 – Writing and publishing online
Your site is now truly up and running. All it’s lacking are your thoughts and feelings. It’s time to write some content—to create pages and posts. As they both work in similar ways, let’s see how you create a new page:
Go to the left sidebar menu > Pages > Add New.
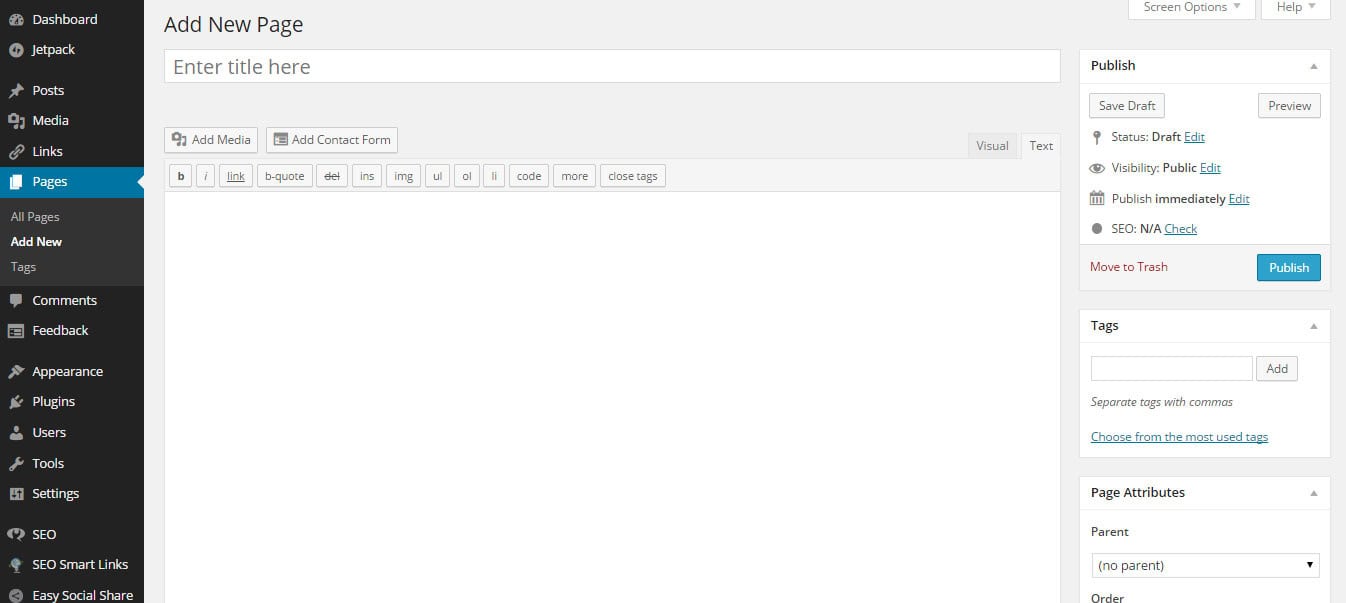
Now, try and create the following pages:
- Homepage (the main page of your site, the first one your visitors will see);
- About me (the page where you write a short text about yourself and your life experiences);
- The Road So Far (the page where you write about the countries you have already visited);
- The Road Ahead (the page where you write about your future traveling plans);
- Contact (the page where you let people know how to get in touch with you).
These will be your static pages, the ones that don’t really change. Then, you will publish posts – or your travel articles, organizing them into categories.
[message_box type=”attention”]Note: In addition to following these steps I have described here, you should really take some time and explore all the sections and features on your WordPress Dashboard. The more you click on and read, the more you will know about the system that runs your website.[/message_box]
And there you have it! Your very own personal travel blog waiting for visitors!
[message_box type=”info”]If my page helped you creating your own blog, please remember to put a link of Nomad Revelations in your new travel blog. This way we can stay in touch.[/message_box]

